Don’t you just love the social aspect of joining the massive fleets at the Bay Bridge pilings, Swan Point, Love Point, or Podickory? Isn’t it fun to jockey between five other boats to get in a cast, tangle lines with unknown anglers, and listen to reggae, rock, and R&B – coming from different directions, all at the same time? Um, no. In fact, most anglers join the fleets not because they want to, but because they feel they have to. And nothing could be farther from the truth. One often-overlooked option for Upper Bay anglers is fishing the B2B zone: Bodkin Point to Belvidere Shoals.
These spots are relatively small, and as a result, don’t often attract a fleet. The down-side is that you may run to one or another, only to find three or four boats there. And at the spots we’re about to look at in detail, three’s a crowd. Fortunately, all are relatively close so hopping from one to the next usually isn’t a big deal.
Bodkin Point
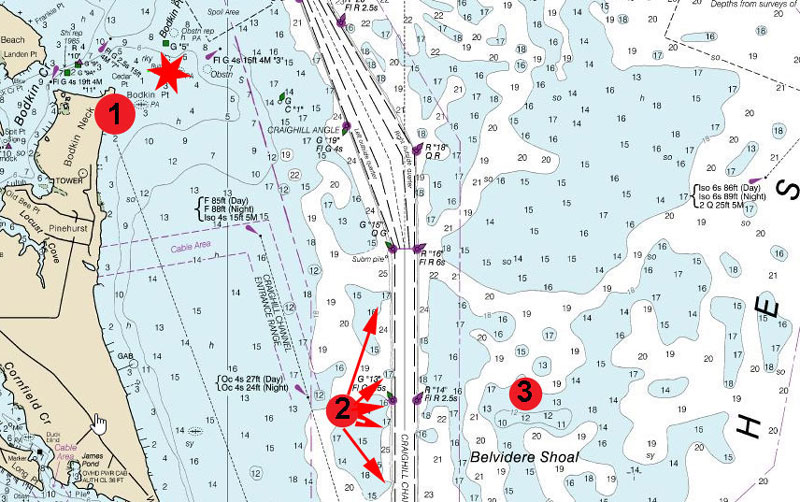
The Bodkin Point ruins, marked with the star at spot number one, are the remnants of a lighthouse built in the 1820s. It collapsed in 1914, and what remains today lays beneath barely under the surface on a low tide. As a result, this spot is best fished by a shoal draft boat and should be approached with caution or under the power of a bow-mount electric trolling motor. Between the green number-five marker, the point, and the green-three, locating the ruins isn’t incredibly difficult – just remember that it’s easy to locate those rocks the hard way.
Thanks to the depth this is also a spot best fished early and late in the day or under heavy cloud cover, when stripers are likely to be feeding in the shallows. The end of the incoming or the beginning of the falling tide is usually best, too, so when high water matches up with daybreak or sunset you have a best-case scenario.
Pitching (light) jigs for stripers is often effective here, as long as you keep your rod tip high and your retrieve fast. This is also a great area to sling topwater (Bomber Badonk-A-Donks are a killer). Locals will tell you, however, that it’s also very effective to slow-troll floating plugs that swim just beneath the surface. If perch are in your plans, try slinging a Perch Pounder or similar spinnerbait.
Channel Edge Lumps
Just south of Bodkin there’s a series of lumps that push right out onto the edge of the shipping channel, one of which we call Billy’s Lump in my family, because my brother Bill loves fishing it so much that we couldn’t ever cruise past without trying it. Again, these lumps are fairly easy to find. Look at number two on the chart, and you can clearly see how these spots press right up against deep water. On the channel side the edges are like sheer cliffs – and they often hold stripers. Up on top of the lumps usually swarms with white perch, and in seasons when spot and croaker work their way this far north they’ll reliably be found on these lumps as well.
Catching the panfish on top of the lumps is easy enough: drag along a bottom rig with number-six hooks baited with bloodworm or grass shrimp, and the action is often fast and furious. Getting the stripers to bite can be a bit more challenging. Years ago the standard technique was wire-line bottom-bouncing up and down the lumps with yellow or white bucktails dressed with a strip of pork rind. No doubt this would still work today (if you can find someone who still has monel spooled on their reels), but in modern times it’s much more common for people to bounce jigs across the lumps. In the late fall, if rockfish over 26-inches move in eeling here can also be quite effective.
Belvidere Shoal
The name Belvidere Shoal is commonly applied to the many shoals snaking through the area just east of the shipping channel, but the finger running east-west just below number three on the chart is probably the most reliable chunk of bottom of them all. Again, it’s often covered with perch on top and stripers are more likely to be found on the edges, especially on the southern side where there’s an abrupt drop-off to 20 feet. Truth be told, however, it’s well worth putt-putting through this entire zone because you never know just which edge you’ll find the fish on – and there are plenty of edges around here to work with.
This spot was also a killer for bottom-bouncing – which can be performed with braid and a slightly modified technique – back in the day. Any yes, jigging works great here, too. Interestingly, however, historically this also a great lump to set up and chum on. The lump’s small enough and the drop-off is sharp enough that you can drop the anchor in shallow water and simply let out line in small increments until your boat is sitting right over top of the fish, whatever depth they’re holding at on the edge.
Do these spots usually hold those massive schools of fish that garner headlines? Nah. But nor do they attract huge crowds of boats. So as you cruise up, down, or across the Upper Bay this summer and fall, remember that the B2B can make for some great fleet-free fishing.
- By Lenny Rudow
Sign up here to get the weekly FishTalk Chesapeake Bay and Mid-Atlantic fishing reports in your email inbox, every Friday by noon.