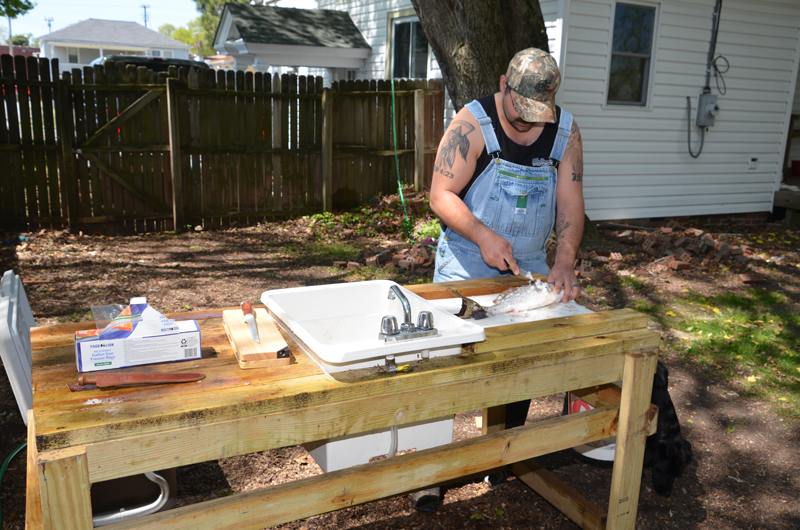
For many anglers, the best way to cap off a day of Chesapeake Bay fishing is with a fresh fish dinner. The idea for a fish cleaning station sprang from pure necessity. Growing up, Dad said that if I wanted to bring home fish and game to eat I needed to learn how to clean it — so he taught me. As we both grew older, cleaning the catch from our many adventures became primarily my job. I used to dig a hole in the backyard to bury the parts we didn’t eat. I cleaned our catch on a simple cutting board or sometimes used the top of an ice chest, but I still had to squat down or kneel. As I got older, kneeling got rougher on my knees.
I wanted something large, rugged, and mobile that could handle a variety of cleaning jobs that I could do from an ergonomic standing position. Being in the military, I also wanted something that I could move around, place where I wanted, and take with me when I moved. I also wanted access to water so I could wash the meat and not risk dropping it on the way to the kitchen. Now that I’m married, my wife appreciates not messing up her kitchen!
I looked around at various large sporting goods and building supply stores and saw some good ideas, but none really fit all my needs. Therefore, I decided to fabricate exactly what I wanted to fit a guy my size. For the design, I borrowed ideas from several different cleaning tables that I saw in the stores and added my own unique touches to build a customized ergonomic cleaning station — something any angler could do for a useful project this winter.
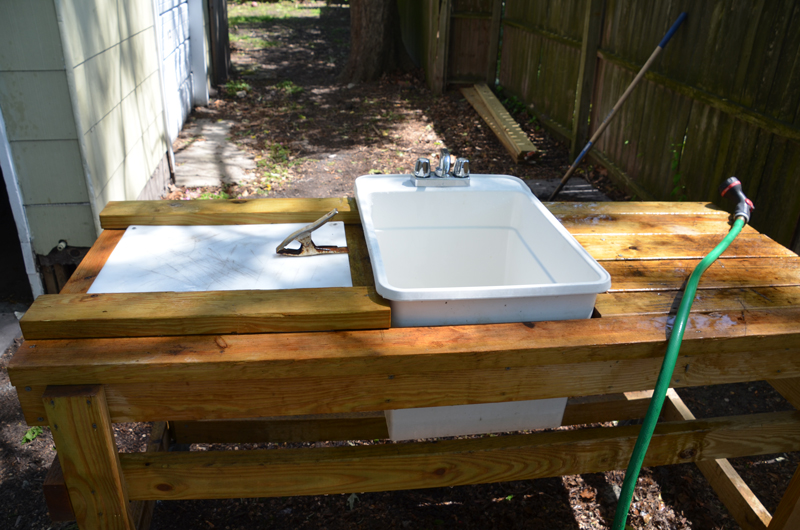
For the basic construction, I used two-by-fours and bought a cheap plastic sink. The materials probably cost about $250. A person could save a little money by obtaining an old sink that someone throws out when remodeling a house. For a backyard fish cleaning station, it doesn’t need to be new or fancy.
On one side, I added a big cutting board and attached a clamp to the board to hold fish by the tail as I cut them. For the sink, I built a box out of two-by-fours. The sink free-floats in the table so I can lift it out and clean it or under it as necessary. Then, I built the legs and beefed up the chopping board side. I had to add a couple of two-by-fours to the cutting board side so the board would fit.
The hardest part of building the cleaning station was the plumbing. I couldn’t find anything specific to my needs, so I had to make everything out of PVC pipe and flexible 3/4-inch rubber hose. The sink has a connection for a water hose, but it’s not permanently hooked up to running water. When I need water, I connect the garden hose to the sink and rinse everything off.
The sink has an opening at the bottom so water runs directly onto the ground. If you want a more permanent arrangement that doesn’t make a mess, you could easily make a drain for the sink. Or, you could put a bucket or a garbage can lined with a trash bag under the hole to catch all the scraps. For me, it was easier to mount a hook on the cutting board side where I can hang a bucket. I toss anything I don’t want into the bucket for burial later.
It’s a very solid piece of construction that weighs about 200 pounds. I weigh 250 pounds and I can stand on one side of it without it tipping over. With it that heavy, I didn’t want to carry it so I put casters on the four legs. If I build another one, however, I wouldn’t use casters. Casters turn independently, and that becomes inconvenient when trying to maneuver it around. Instead, I’d get a pair of large wheels off a wheelbarrow or the back of a lawnmower. I would put those on one side and two casters on the other side. Then, it could be moved around like an outdoor grill.
From the time I unloaded the materials until I was ready to clean fish, it took about five hours of work. I think anyone could build such a cleaning station for themselves in a similar amount of time. One thing I learned — and it’s an old lesson — definitely measure twice and cut once. Always cut a little less off than necessary and then fine-tune it from there.
If anyone would like me to make a cleaning station or has any questions, email me at [email protected].
List of Fish Cleaning Station Building Materials
- 1 sink (plastic is best) with faucet and spout
- 1 large cutting board 1/4-inch thick
- wheels (optional)
- 1 spring-loaded metal clamp
- 12 pressure-treated 2x4x8s
- 5 feet of 1-inch diameter PVC pipe
- 1 PVC adapter for a garden hose
- 1 can PVC glue
- 2 feet of 3/4-inch flexible rubber hose
- 1 tube clear silicone
- 1 threaded adapter for flexible hose
- 1 PVC adapter to flexible hose
- 3 conduit clamps
- 2 hose clamps (3/4-inch flexible hose)
- 2.5-inch wood screws
- 1-inch wood screws
Step-By-Step Instructions for Building a Fish Cleaning Station
- Build a frame around the base of the sink out of 2x4s. Make sure not to build the frame too tight. The sink should be able to slide in and out of the frame easily.
- Screw in two 2x4s 60 inches in length to the front and back side of the sink frame. Attach a 2x4 to the sides, making a bigger frame.
- Attach the legs of the station to each corner of the frame. For stability, attach 2x4s to the inside of each leg, making braces. If desired, attach the casters or wheels.
- On one side of the frame attach the large cutting board. Use additional 2x4s as needed to ensure the cutting board fits correctly. Using the 1-inch screws to secure each corner of the cutting board. Now, attach the metal clamp to the cutting board on the side closest to the sink to serve as a fish holder.
- On the side opposite of the cutting board, attach 2x4s running width ways on the inside of the frame. After braces are complete, screw in 2x4s to the top of the frame and braces. This serves as a chopping block.
- Assemble the PVC fittings starting with the garden hose attachment. Glue the garden hose attachment to the end of the pipe. Measure out distance to under the sink. Cut the pipe, and glue on PVC to flexible hose adapter. It might be necessary to secure pipe to frame or braces. If so, secure with conduit clamps.
- Bore a hole in backside of the frame under where the water hookup is. Line the threads of the sink with Teflon tape and secure the flexible hose adapter to the sink. Measure out the distance between two adapters and cut flexible hose to size. Line brass fittings with clear silicone, and attach flexible hose to both pipe and sink. Let the silicone and glue dry before running any water through the cleaning station.
- By Daniel J. Felsher as told to John N. Felsher
Daniel J. Felsher grew up in the sportsman’s paradise of south Louisiana. Being the son of an outdoor writer, he began hunting and fishing at a very early age and frequently accompanied me on many adventures. Always handy with tools, Daniel now serves on active duty with the U.S. Navy as an aircraft engine mechanic based in Virginia. – John N. Felsher