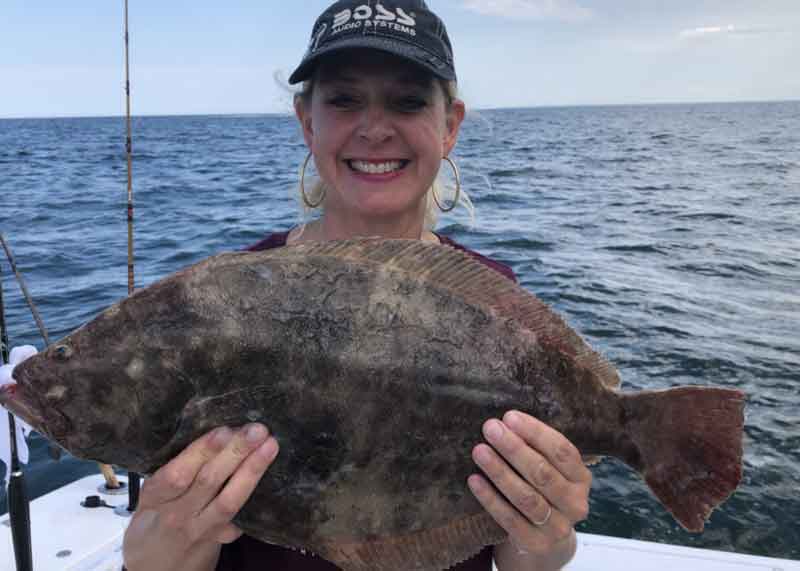
Having an understanding of the anatomy of a fish and how that fish feeds can definitely help the angler in catching it, and this is certainly true when it comes to flounder. Summer flounder is a flatfish with both of its eyes located on the left side (when viewing the fish from above). The position of the eyes allows it to look up while concealed in sand or muddy sea bottoms, with both eyes open, in hopes of snagging an unsuspecting meal that passes over top of it. Flounder also have spots on their back to assist in their camouflage, allowing them to blend easier with the natural surroundings.

How Flounder Bite
When the bait fish is engulfed by a flounder it will first “scale” the baitfish then it will run the bait through its mouth a second time before swallowing it. This is why the angler needs to allow several seconds for the fish to eat a bait, and not overreact when the fish is first felt on the line. When using a long strip of bait keep in mind that even more time may be necessary for the fish to engulf the bait. For larger baits, applying a small “stinger” hook towards the back of the bait may help you land some of the larger flounder. Natural presentation of course is best, especially with live baits, but if you start having short strikes, this alteration of adding an additional smaller treble hook can be a game changer. Hook styles are of course of the angler’s preference, but some solid practices for flounder fishing are using a Kahle hook with a cut bait strip, when using dressed skirts, or when using bucktail and beaded hardware. A plain hook suffices when using a live bait.
Having your rod tip positioned closer to the water versus high and upright in the air before setting the hook gives you a slight advantage, and a more solid set into the mouth of the fish. This method in particular is quite productive when fishing in windier conditions, and also prevents the wind from blowing loops and bows into the mainline.
Because flounder prefer to live around areas with structure such as rocks, reefs, sandbars, docks, bridges, and drop offs, know that if you are fishing in the correct spots, you are going to snag sometimes. To help make this situation a little more tolerable there are some things you can do. Having multiple rigs pre-made for live baiting is one. When fishing strip baits, pre-freezing flounder belly, Spanish mackerel, or bluefish strips that are lightly brined and pre-cut in air-tight baggies is a huge advantage for both re-rigging and quick bait-ups. While fishing be aware of the depth as it changes, hold your rod, and bring in or let out line accordingly. If you still get snagged and are using a conventional reel, disengage the reel and wrap the line around the reel two or three times on the frame, reengage the reel, remove the slack, and then pull upward in attempts to release the snag. This simple step can prevent damaging the internal bearings of your reel.
Heat and humidity, believe it or not, are actually friends when targeting these fish — if you can deliver the goods by putting the bait right in their face. Much like people, the intense heat makes these fish less likely to go out and search for food. They will instead stay hunkered down, usually in deeper water, in hopes of ambushing their meals. Slow-trolling usually allows you to cover more area and potentially deliver more groceries on those very humid late summer days.
Trolling for Flounder
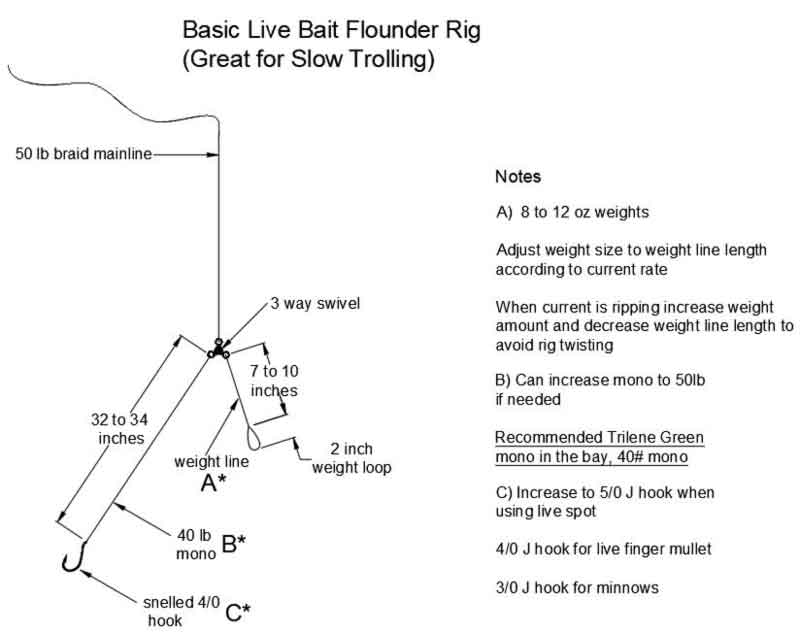
Slow-trolling is just that: going super-slow and hovering over, and frequently passing over, the areas that are productive. Dropping the engine in and out of gear when covering areas such as rockpiles or pilings is especially helpful in generating hookups. The change in speed usually creates a natural looking drop that mimics an injured fish, and these lazy flounder are all about getting a quick easy meal. A long-leader live bait rig (similar to a standard flounder rig but without any bling) works well on the slow troll in this particular situation. A 50-pound braid mainline is recommended when slow-trolling for flounder. For the rig, use 40-pound mono line with a three-way swivel and 32 to 34 inches of line for the bait line, and seven to 10 inches of line for the weight line. For easy and quick sinker changes, always tie a loop on the end of the weight line sized to accommodate the largest weight you may need for that day.

Once you find a concentrated area that’s holding flounder you can always choose to change things up a bit, by perhaps jigging during the slack tide, for example. Bouncing soft plastic jigs on bottom (the Gulp! Swimming Mullet in white, chartreuse, or pink are classic choices) has become more and more popular in recent years and can prove highly productive at times.
Lower Chesapeake Bay Flounder Hotspots
Some areas that have been productive with the big “doormat” summer flounder include Cape Henry Wreck, The Cell, Back River Reef, and the Chesapeake Bay Bridge-Tunnel (CBBT). The CBBT, of course, has several fish-attracting components: its four islands which contain rocky areas, the tubes, and the uppermost area known as the High Rise. Some clues you can seek out when you get to these locations is look for lots of bottom structure and rubble on your fishfinder. Areas with channel edges and rocky areas are usually your best bet.
-By Beth Synowiec
Flounder Fishing Tactics
The tactics described in this article are effective in relatively deep water in the Lower Bay and at the mouth of the Chesapeake. But flounder will also be found in the shallows, in coastal bays, and off the coast at reef and wreck sites. Tactics for each scenario differ greatly so if you’re heading to a different type of hot-spot check out:
Hampton Halibut: Flounder in the Shallows
How to Fish for Flounder in DelMarVa Bays and Inlets
Fall Flounder Fishing at the Coast
Deepwater Doormats: How to Catch Flounder at Ocean Reef Sites